Friday, May 21, 2010

Sometimes you need to take a break from the routine of work and worry and just kick back and enjoy the Lord's blessings of life and nature. So I got up at 4:00 a. m. threw on some clothes and drove to the bay to do some wade fishing. San Luis pass on Galveston's west end is a perfect place because you can fish the surf on the ocean side of the pass or the flats of the bay side. The ocean surf side can be very dangerous to wade fish because of the fast moving currents and you could get seriously killed. Many people have drowned there. I have seen the tide moving so fast that I think it could drown a fish. So I stick to the bay for wading where the water is generally calm. The fishing pier that extends out into the mouth of the bay is no longer there thanks to hurricane Ike. I am not what you would call a serious fisherman, probably more like a hobbyist. My equipment is not top of the line and I know a few basic knots. One thing I have learned about fishing is that it has nothing to do with catching fish. I got to the Rusty Hook bait shop at sun up and asked the old salt there if anyone had been catching any fish. Here is what he said. ( Fill in your own curse words.)

"Yesterday the #*@**#!!## water was green and the wind was light. But you're not fishing yesterday, you're fishing today. Everyday is different and you have to ##&**$# work with what you have. That's why they call it fishing not catching."

I'm glad I got that pep talk ?? because I had just about decided not to buy any live shrimp. So I bought a pint of shrimp and drove the remaining few miles to the bay. I love to see the sunrise over the water. I wonder if it does that on the days I am not there? Kind of like the tree falling in the forest thing. Before getting into the water you need to be sure you have everything you may need when you are wade fishing. You can wade in knee deep water for hundreds of yards in San Luis bay. It is a long way back to get those pliers you forgot. Pliers, extra tackle, wading belt, bait bucket and bait, all stainless knife, stringer, net. I had it all. But it is just as important to remember what not to bring. So I get out about 200 yards and realize I forgot to take my wallet out of my pocket. Salt water is not kind to wallets. I found that out the hard way once before. So back to the car. You will notice that walking in knee deep water slows you down considerably. Knowing where to fish in the bay is easy. You can fish anywhere there is water. I like to wade until I come to a trough or a gut that is at least six feet deep and stand in water about waist deep while casting into the deeper pool. I say stand because there ain't no place to sit down. The exciting thing about fishing the salt is the variety and size of the fish that are there. Fortunately the water is not generally clear enough in the bay to see any of the fish unless they jump out of the water. I say fortunately because if we could see the size and specie of some of the fish swimming around out there it would probably cut down on a lot of wade fishing. By the way, always wear long pants and an old pair of tennis shoes when wade fishing. I made the mistake of wearing shorts one time and a trout tried to eat my Achilles tendon. More than once. I had two fang marks from his front teeth. So part of the excitement is never knowing what might be on the other end of the line. Do you really want what is trying so desperately to get away from you? You are at a distinct disadvantage when up to your waist or deeper in water trying to maneuver a fighting fish. But what if it is not exactly a fish. I have had to cut a sting ray loose before. My favorite trout rig is free lining shrimp using a medium sized spinning reel armed with 12 LB. test line and a small treble hook with one barb removed. I try to keep the drag set fairly loose just in case you get a runner. I was minding my own business when suddenly something grabs the bait and just about doubles over my light casting rod and starts stripping line off of the reel. So I stand there watching the line left on the spool get smaller and smaller. There was not a lot I could do to slow that fish down. So I start tightening down the drag a little bit at a time until inevitably the drag exceeds the strength of my line. I am sure a more experienced fisherman could have figured a way to fight that fish, or whatever it was. About that time I was wishing I had my heavier surf rod instead. But like the old man at the bait shop said, "You have to #*$%%#** work with what you have". There was a guy about 50 yards away observing my brief fight with an unknown assailant. I think he was just as excited as I was. So was it just a waste of time? Not hardly! I could talk about fishing all day long and probably not know a whole lot more about it. You just have to do it if you are so inclined. I once made the mistake of commenting on the topic of shopping to Brenda. The remark went something like "you have been gone all morning without buying anything and you call that shopping?". She observed that I am gone all day without catching any fish and yet I call it fishing. Touche! Like the salty dog said, "That's why they call it fishing not catching."


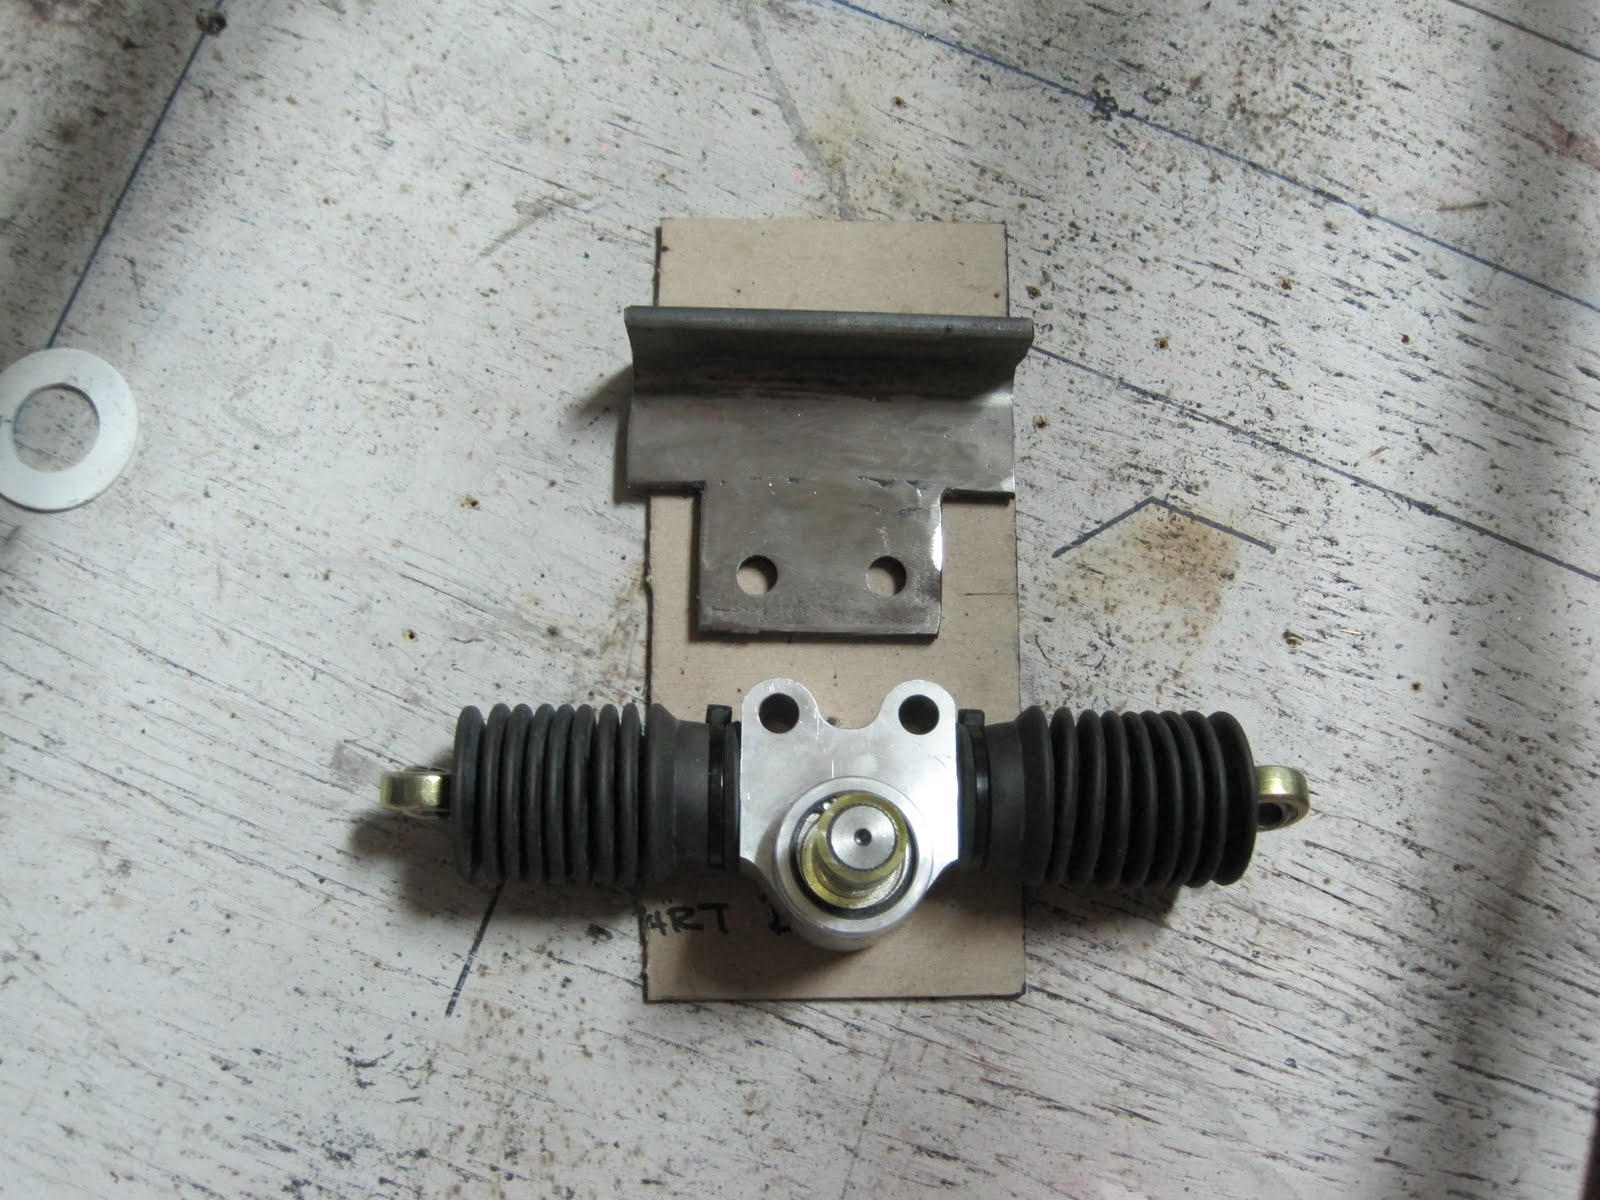
Now back to setting up the steering. I believe it is best to center the rack and pinion in the frame. I am not sure about the geometric dynamics involved here but it just seems like a good idea. This poses a problem because this is set up as a two seater so the steering wheel will be on the left side of the cart ( where it is supposed to be for benefit of you Europeans.) This will necessitate using U joints to angle the steering shaft. I don't really want to do it but I need the practice at setting it up. With the rack temporarily wedged in place we can now measure the lenth that is required for the tie rods. The tie rods will be fabricated using 1/2" diameter round tube with 1/16" wall. I am using the design from the S11 go cart I built from the U-buildit plans. The Spherical rod ends are 3/8" size so we will need to weld a 3/8" coupling nut on one end. You will need to back off on the power setting of the welder and carefully weld these on so you don't distort the threads with too much heat. Just tack it a couple of places then go do something else while it cools a little. Use this time to cut and drill the connectors for the other end. Or maybe finish cleaning the salt off of the fishing gear. We will go ahead and finish weld this end on and be done with it. If we need to adjust the lentgh it will be easier to do on the other end.

After the welding is finished what do you do next? Go ahead and get that flap disc on the angle grinder and smooth it out.


The other end is just a simple piece of 1/4" x 1 3/8" long steel with a 5/16" hole drilled in it to allow for using a 1/4" bolt to connect to the end of the steering rack. It is a little tricky trying to hold a flat piece of steel centered on a round tube. Where are those six monkeys when you need them. So I used 2 pieces of 1/8" steel on either side with magnets. You want to space it equally if possible. The trouble is one side looked more equal than the other.

There. I suppose that will do.
Now you just don't pay any attention to the extra hole in the connector. Why is it there? Well I just happen to like it that way. Don't have time to tell the hole story right now. OK OK I screwed up!

Now we need another one for the other side.

Wednesday, May 19, 2010

It seems like it is taking forever to get to the point of having a "Rolling Chassis". But here is a little device that will save some time as well as make for a very smooth and efficient way to control the steering of the front wheels. It is a Rack and Pinion Gear. It set me back $90.00 plus $13.00 for a splined coupler for making the connection to the steering linkage. This is by no means a must and there are numerous ways to build a simple device to move the wheels from side to side. So for time and efficiency sake I have chosen to spend the money for this item. This unit consists of a rack that is driven back and forth by a gear. The end connections are flexible Rose Joints That adjust in or out as needed and connect to a tie rod that connects to the hole in the wheel spindle. Our job now is to locate the rack so that it can do it's job without interfering with the suspension movement.
So first we have to build a bracket that will hold the rack firmly in place. This can be accomplished using a piece of angle iron that fits between the frame of the nose and then drilling holes to match the mounting holes of the rack. You need to try and center the rack in the nose as close as possible.

OK. Lets bolt her up and see how it fits.

Tuesday, May 18, 2010

Sometimes I let my imagination get carried away. I like to imagine that inanimate objects share in our human emotions. OK. I will try to stay on task. The thing I like most about metal fabrication is the fact that it doesn't necessarily have to look good to be strong and functional. But the goal is for our work to be both attractive and sturdy. Sometimes I will achieve one without the other. Sometimes I achieve neither. But when it all comes together as a strong, beautiful, functional as well as useful creation, then we have achieved our goal. If you are like me then you have no ambition of becoming a master craftsman but you are interested in improving as well as learning new skills. I mention this because it is very easy to become discouraged when things do not seem to go together perfectly. I fret about this constantly. But the fact of the matter is that the most important thing is to try to learn from mistakes and do better in the future.
So now we need to figure out how to connect the top of the rear shocks to the frame. The process is very similar to what we did at the front end. We use the same connecting jig to establish correct spacing. You will recall that it will space us at one half inch shorter than the actual shock length. Once we have a visual perspective of approximately where the shock mounts need to be then we can fabricate a top shock mount or "shock tower" as they are sometimes referred to. I like the term "shock tower". It sounds like some kind of huge complicated engineering marvel. " Yeah, I worked on the shock towers last night. I had to quit after getting about 40ft. up because the wind was coming up." Actually I was quite comfortable sitting there on my bucket boss throwing back a cold bottle of water while measuring out the parts needed for the towers. Like everything else it starts out very basic, two lonely pieces of metal like ships passing in the night. One piece says to the other, "Hey look what I can do." The other says "you look like an L bracket so hold it right there while I get Mr. welders attention."
The next thing you know Guss the gusset arrives a little late to the party and they ask him to stick around.


Before you know it Maggie the magnet wants to get in on the action and insists on a group photo.
I never realized how romantic metal could be.

We will need a couple of gussets on top but we can add them later.


Wednesday, May 12, 2010

Tonight I spent over 2 hours just grinding the lower rear shock mounts and getting them tacked into place. This makes me think about time and how we spend it. Each one of us has only so many days on this earth and constantly make choices as to how we spend those days. I begin to wonder if the time spent on this project is worthwhile. What else could I be doing that would be more productive? But is productivity all that there is to it. It seems to me that our society is becoming ever more complex. There is so much to do and consider before we can even start producing. So we have productivity and complexity. You may ask why I am wasting my time writing this drivel. I may ask why you are wasting time reading it. I would like to think there is a purpose for doing things the way we do it. Could it be that rules and regulations become more important than the activities they regulate? I could ask why you are wearing a red shirt today. You might respond that if you wore a different color shirt I would still ask the same question. When questioned why she always chopped the end of the ham off before baking it a woman replied that her mother always chopped it off. In curiosity the woman asked her mother why she did it that way. Her mother replied that her oven was not long enough for the entire ham. I could tell you to slant the bottom shock mounts at a 20 degree angle. Why would I suggest such a thing? What if 19.5 degrees would be better? The point is that we have to try something. My mig welder was not making good welds at all tonight. My first suspicion is always "operator error". So I had to keep adjusting things until I finally got it back to acceptable. But what if the fix had nothing to do with anything I did. It is kind of like replacing an old sticking thermostat on your car with a brand new defective thermostat with the same problem. Talk about messing with your mind. That is not supposed to happen. So you keep on searching for another problem that does not exist. Has this ever happened to me? Of course it has and most likely has happened to you as well. So what really constitutes wasting time? Are we learning something that we could not find out any other way? It is time for incessant questioning to end and action to begin. So why a 20 degree slant? I just read it somewhere. Did I use an angle gauge to set the angle? Not just no.

Tuesday, May 11, 2010

It really feels good to have that old golf cart out of the way. I am taking the component parts I salvaged up to the shop at work where I have some spare space and put them back together so I can further trouble shoot the electric components and see why it is not working.

Now we can move to the rear of the cart and work on getting the shocks in place. Here is another tool that saves a lot of time and effort. This pipe bender uses hydraulic force to contour pipe of a given size into a given radius. I am by no means an expert at using one of these. But I like to learn new things and try to improve my existing skills. This is a very simple and efficient machine. You can spend thousands of dollars for fancy precision bending machines that are used in producing custom race cars. You will notice that the bending die is located in the center of the press. This press comes with 8 dies for 1/2" through 3" diameter pipe. You can control the radius of the bend that you require by moving the hitch pins inward or outward along the pre drilled holes that you see angled on either side.

We will need to bend some 3/4" pipe into a radius so that it will accept the lower shock mounts on the rear swing axles. Why? Well we just want to be sure the brace does not interfere with the axle when it pivots upward. How do I know which holes to insert the hitch pins into? I don't! I just know that it will need to be a fairly tight radius because it is spanning only about a 4" width. This is all just trial and error. Is that a bad thing? I don't think so because it forces me to pay attention and try to visualize and anticipate the outcome. It is just like any other kind of skill. The more you do it the better you become. But how many of us bend pipe enough to really get good at it. I know I don't.
So the point is don't get frustrated if it does not come out right the first try. I made several pieces before getting the hang of it.


The good thing about bending pipe is that you don't have to bend it all the way at once. When you are making more than one piece just get the first one bent to where you want it and then use it as a pattern for the rest of the parts. In the next photo I am visually comparing the finished part at the bottom to the second part I am bending. You can tell that the radius is not quite bent enough yet. So what do I do? If you said just bend it the rest of the way by hand then I would say you have me confused with Popeye the Sailor. Put it back in the bender and bend a little more is the answer. And what if I bend it too much? Well if you put the the pipe back in upside down it will also unbend it. However this only works for small corrections as the pipe tends to begin to distort if you bend it too much in reverse.


That looks about right. Now the ends of the pipe need to be contoured to fit the radius of the pipe on the swing axle. I would like to say that all you need to do is stick the pipe in the notcher and it will perfectly contour the ends. But since the pipe is not straight it is easier to just notch it by hand. Just get it as close as you can using the bench grinder and it will be fine.


Now we have a place for the lower rear shock mounts to call home.


Now we will need some structure that will allow for the attachment of the upper shock mounts. At this point the design is pretty much wide open as long as it provides for solid pick up points for shocks, counter shafts, sprockets, brakes, motors, lions, tigers and bears. Some thought must be given to reinforcing the frame in order to make it as stiff as possible. With a little forethought, structural reinforcement may serve double duty as a connecting point. Allan Staniforth suggests that we put up a sign in our work shop that says, "I will never never, NEVER put bending loads into the middle of a tube or panel". So here I am trying to connect the upper shock mounts into a stretch of tube. Well I have an idea in mind of how to support it so let's get started.
The first thing to do is tack on some uprights. Now we want these to be level in the horizontal and vertical planes. In this photo you will find a level I had forgotten about that makes the job much easier. It has a magnet on it and therefore frees up a hand to straighten things up. I am going to get another one so I can free up another hand. If I buy three of them this project just might build itself.
Now we can plan where to put the upper shock mounts.

Tuesday, May 4, 2010

OK. Here I am for a fresh start at trying to finish the front mount I couldn't seem to get lined up right last night. It is amazing how much easier things can go when you are not so tired. How long did it take to finish it up? Not very long. Now I need to turn my attention to another project that I need to get out of the way. You may have noticed that old golf cart in some of the other photos. It is a early 90's model EZ GO brand. I bought it so that I could learn how battery powered vehicles work. I built a mini Baja racer a couple of years ago that I am thinking of converting into an electric utility vehicle. The idea is to use components in this old golf cart in the rebuild of the Baja racer. This old golf cart is in very sad shape but at least I can see how the various components are arranged. Just in case you are interested a golf cart consists of 6 main components. They are:
1. On and off switch.
2. Solenoid switch
3. Throttle also referred to as potentiometer or pot box.
4. Motor controller
5. Motor
6. Batteries.
I am considering making the girls go cart a battery powered cart so I need to know how this all works. I can work on small gasoline powered engines but I know very little about electric motors. This golf cart is really pretty much a worn out piece of junk but I will harvest the parts that I think can be used in the Baja/ Utility vehicle project.

First we need to be aware of a couple of hard working tools that can save a lot of time and effort if you are trying to disassemble a rusty old piece of equipment. The first tool is called a Sawzall and as the name suggests it saws through just about anything. It is shaped so that you can get the greatest leverage possible even in awkward positions. It works well in wood or metal but you will need a Bi metal blade to cut metal. Even with a dull blade it cut through the main frame of the golf cart in less than a minute.


Another tool that is great for coaxing loose those rusty old nuts and bolts is an electric impact hammer wrench. It looks and works like a regular drill except that it uses a hammering force when it encounters any resistance. This is what they use to remove the lug nuts from your wheels when you go to the tire store to have your tires replaced. That hammering noise followed by a whoozing noise is an impact wrench hammering the nuts loose and then quickly unthreading them the rest of the way off of the lug. They are not cheap and this one set me back about $180.00. But you can rent these at your local tool rental store. You will be glad you did.
The following photos show what it looks like under the bench seat of a golf cart. It looks really complicated but that is mostly because the few major components have to be wired together in a number of different places. Here is a shot of the motor which sets on top of the differential drive.


This is the forward and reverse switch. I think I forgot to mention it as one of the major components. I believe the newer carts have the reversing switch built into the controller itself.


This next photo shows the solenoid, pot box and motor controller.


In the next photo you will see 6 batteries. These are the size and weight of a regular car battery but they are very different in that they are deep cycle batteries. Deep cycle batteries are designed to be drained of their power and then recharged. A regular car battery must maintain a constant charge level in order to opperate correctly and would not last long in a deep cycle depletion service. This cart runs on a 36 Volt system. Can you guess how many volts each battery has? 6 volts is correct. The function of batteries is another subject we could spend a couple of hours discussing but there is plenty of information out there if you are interested.

Here is a shot of the rear end that I may use for the Utility project. The thing I like about it is that the motor is already matched to the drive and it has brakes built in.


The golf cart has one tire that has any life left in it.


So that is about it for the old girl. There is no telling how many bad golfers she hauled around in her days. I am going to keep the front spindles and hubs because they are very heavy duty and they just might work on a future project.


Monday, May 3, 2010

The short side of the mount lined up perfectly and the magnets held it firmly until I could tack it in place. But wait.. isn't it supposed to be on the other side of the jig. Oh yeah now I remember that I changed it around for some reason when I was bolting it on to the jig. It is a simple matter to untack it and redo it. But I mention this because I wonder how often it happens to anyone else. I am not talking about just making a mistake. That is going to happen to even the most talented. What I am talking about is something that happens to me occasionally after making a mistake. In this case I just wanted to finish this mount before calling it a night. So once I found out my mistake I simply ground off the tack welds and ground everything smooth again. Then I spent the next hour trying to get the mount lined up correctly without success. How could I hold it in place so easily the first time and then not even get close 5 minutes later? I tried to use 3 different magnets to hold the mount in place but it just kept falling apart. I doubt I could have done it with six arms and five monkeys. Everything had just fallen into place smoothly when I did it wrong the first try. Now I couldn't get it to work no matter what I did. After an hour I decided my time would be better spent in bed. Which brings me to another phenomenon I wonder about. Have you ever been trying to fix something without success and then dream about the answer to the problem? I have done this more than once and have talked to others that have experienced it as well. That is the power of the subconscious. Maybe I could work better if I was asleep. Wow! What an idea. Sleep all day while you are working and then stay up all night doing the other things you want to do.
Here is a picture of a mount precisely tacked in the wrong spot.