 After determining the length of the pedal we need to weld it on to the pivot shaft at an angle that would be convenient to step on and rotate the shaft in the opposite direction.
 With this set up the forward motion will be activated by pushing the top pedal forward and the reverse is activated by pushing the bottom pedal downward which in turn reverses the direction of the valve spool.
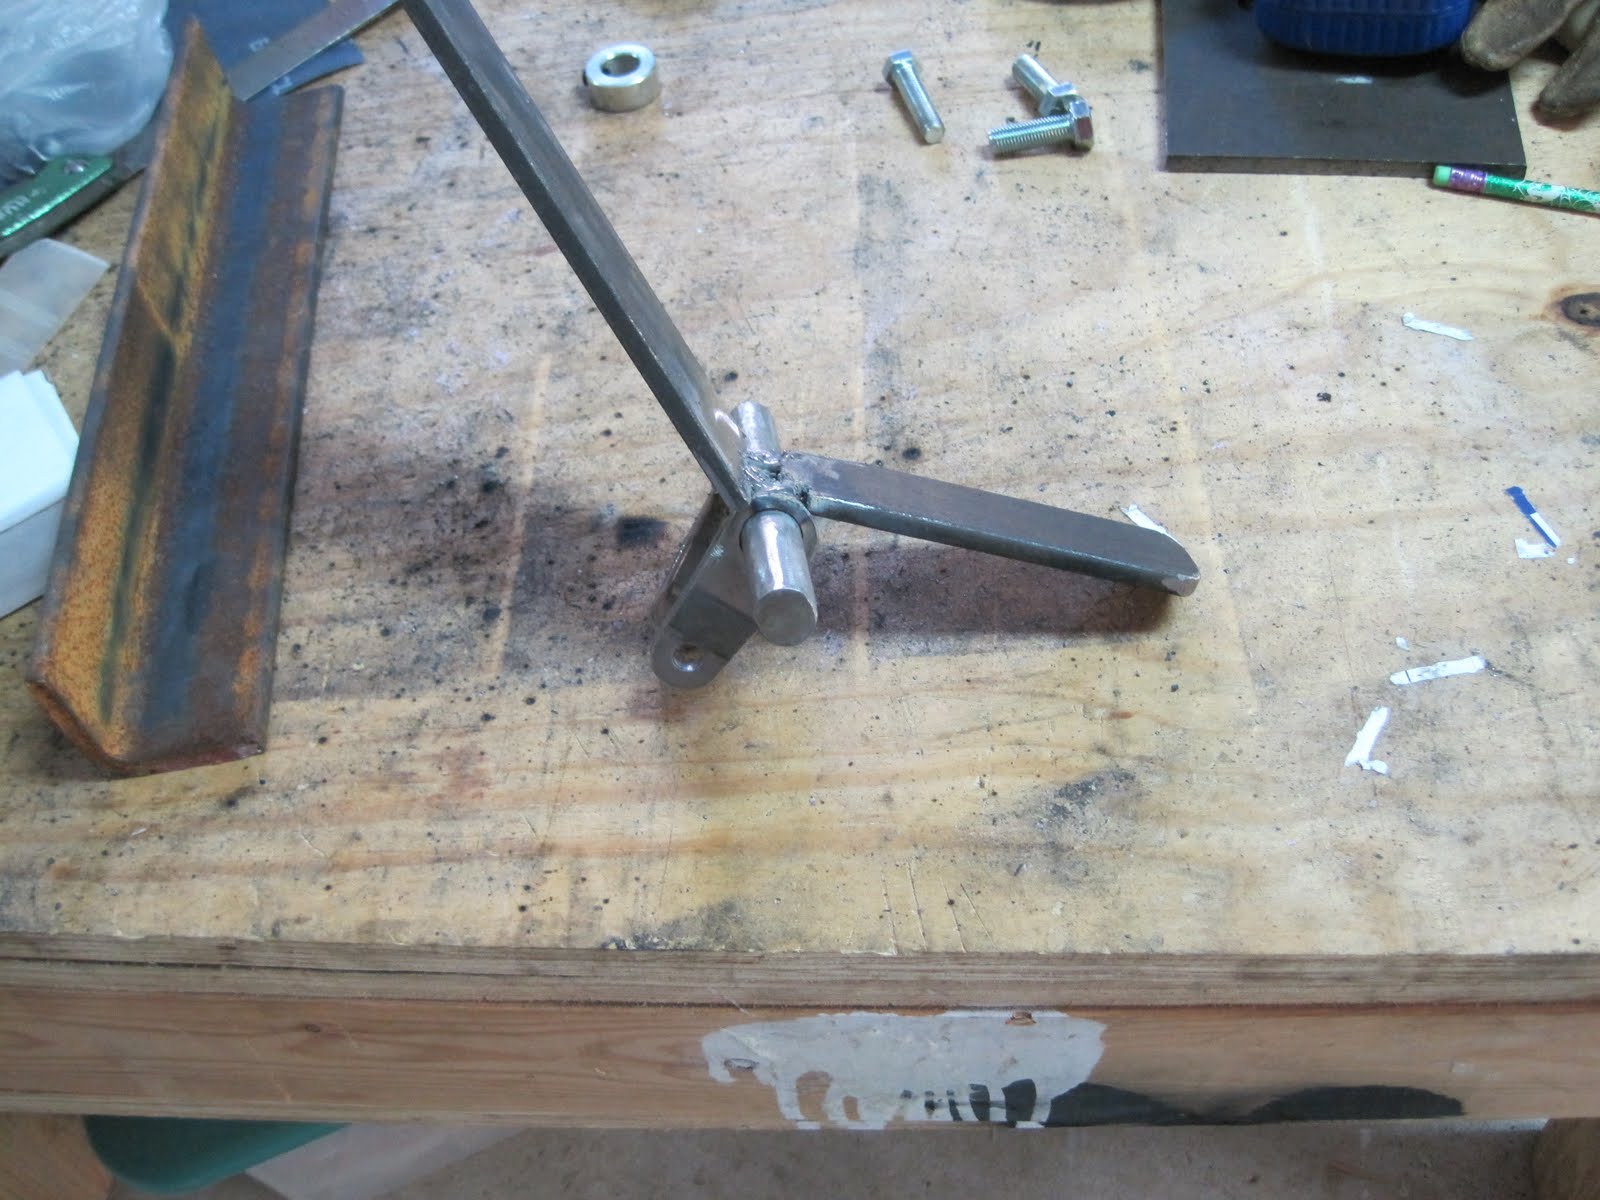 Now we need to move on to fabricating the roll cage. I do not anticipate a real need for a roll cage on this cart as it will move relatively slowly and should have a fairly low center of gravity and a wide wheel base. But I do want it to be as safe as possible and you never know what unanticipated stunts that kids may pull. The roll cage is made from 1" diameter tube. This means it is 1" outside diameter with a wall thickness of a little less than 1/8" thickness. It will be strong enough for a roll over if we use just a little bit of planning. We will need to revisit the pipe bender for this Fab.
As a quick review it consists of a hydraulic jack that is pumped manually with a handle.

The pressure is released by means of a twist valve that is located at the bottom of the jack.

The top rollers can be easily removed in order to insert the pipe if needed as well as modify the bend radius.
 I would be lying if I told you I was an expert at bending pipe. I can tell you right now that it is just as much an art as it is an exact science. All I can really do is give a few pointers but you really have to actually bend some pipe in order to learn. We will start with the back of the roll cage. For time and simplicity sake I have opted to make the rear roll bar in 2 pieces. It is always best to make the sections of the roll bar in one piece if possible especially if it will be used as a racing cart. I have made a chipboard template for a pattern to follow. The radius of the one inch bending die that is supplied with this bender will make a six inch radius if you bend the pipe 90 degrees. The radius I am trying to achieve is larger than six inches. What this means is that it will not be possible to make the desired radius by simply putting the pipe in the bender and bending to a 90 degree angle that is required. It will be necessary to bend a little bit and then loosen the bender and move the pipe a little farther and bend some more. I know this probably doesn't make a lot of sense but you have to start somewhere.
 The first thing you want to do is be sure that your piece of pipe is long enough to make the desired part. I just leave a few extra inches to be sure. You will be able to leave less of a cushion as you get a feel for how the bending works.
 I went ahead and bent the first piece and as you can tell my radius ended up a little smaller than the template. This is no problem because I chose the radius of the template more for its visual appeal than for any form or function. Now that I have one side done I will use it as the template for the other side in order to assure that they are the same. You can begin to understand why I wanted to make this in 2 pieces so that I can just cut the sections to length. In other words that is most likely what I would have to do anyway because my skill level is not great enough to start the second bend at the correct spot.
As a little hint it is helpful to mark the next piece at the center of the radius of the piece you are trying to duplicate. You can seen the black mark on the straight piece in the next photo. If you place this mark in the center of the radius of the bending die then you should be able to start the bend very close to where you want tit. I'm sorry about that extra t.
 It is necessary to bend a little at a time and remove the pipe to compare it to the template and continue to bend the radius accordingly.
Just a little bit more. I love this!!
 It would be easy to simply weld the back portion of the roll cage directly to the frame but I want to build in some adjustment. I had a couple of pieces of one inch schedule 40 pipe that can be used as a base and the one inch tube will fit inside. They are welded onto the frame and then the adjustment holes can be drilled through both pieces once the roll bar is inserted.
 We need to be sure that these mounts are welded on straight.
 After having Miss Paige sit in the cart I discovered that the roll bar is not quite as high as I would like it to be. So now I need to add a short length to one of the pieces. The easiest way to weld pipe together is to clamp both pieces in a piece of angle iron.
 This is the end that will fit into the mount on the frame. The flap disc on the angle grinder will sand off the excess weld so it will fit into the mount.
Now we can cut the other half of the roll bar to the same length as the first one.

With both halves of the roll bar inserted into the mounts we can now cut the other ends to the correct length.

You can tell from the next photo that the ends do not line up. What are we going to do about that? If you said bang on it with a sledge hammer then we don't need to get that drastic, yet. As you can see the half on the left is level so all we need to do is remove the right half and make a little visit to the pipe bender.

There. Now that was much easier than the hammer idea and not nearly as noisy.
 As I said earlier I don't really like to make a joint in a roll bar so I will just have to make it as strong as possible. In this case we will slide a section of 3/4" tube inside of the roll bar and weld it to both halves. Then we will slide a 1" locking collar over that joint and weld it all together. Be sure and slide the 1" collar on before welding the 3/4" tube to both sides.
The following photo is blurred but it shows the two halves welded to the 3/4" tube. The collar can be slid over the joint after the excess weld is ground off.

That hole in the collar is for a set screw if you are using it as a spacer or perhaps to hold a piece of key stock in place. We will not need to use the set screw since it will be welded in place.
 The rear section of the roll bar is in place.


No comments:
Post a Comment